The British Whaling Ship Hermes

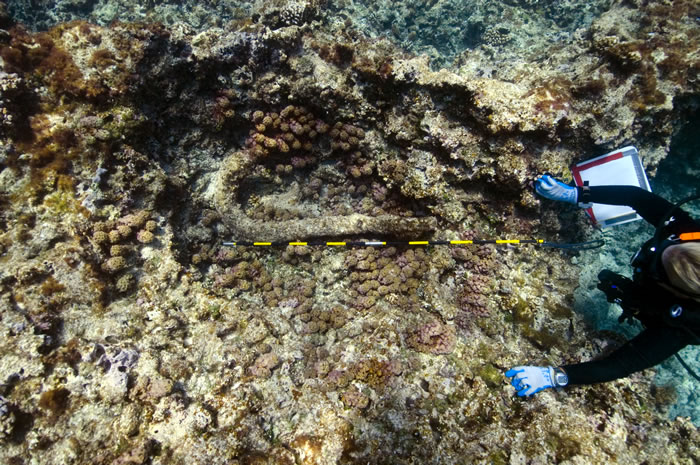
Kelly Gleason investigates an early 19th century anchor at the Hermes shipwreck site. Credit: NOAA/Casserley.
In 2004, NOAA divers in the Northwestern Hawaiian Islands came across two whaling vessel wreck sites at Pearl and Hermes Atoll. Four years later following the completion of the 2006 survey of the nearby Pearl shipwreck, maritime archaeologists finally had the chance and the requisite good weather to map Pearl's consort, the British whaler Hermes, lost on the same night in 1822. The types of artifacts, their position at the atoll, and the first-hand description of the event from the Hermes's carpenter James Robinson, provide strong circumstantial evidence for the identification of both of these sites.
The two iron anchors of the Hermes are the most diagnostic artifacts visible. Their straight flukes, ending in a sharp angle at the crown, are typical of English "old plan long-shanked" anchors circa 1800. The large blubber hook, trypots (one whole, open diameter 100cm and height 70cm--others broken into pieces, and scatter of bricks are indications of a whaling vessel. The Hermes site features four heavily encrusted cannon to the Pearl's two. There are numerous cannonballs (at least 33) and musket balls as well. The cannonballs appear arranged in linear racks. Were these cannon and cannonballs stowed below or on deck ready to use? The most notable features on the wreck site are the approximately 150 pig-iron ballast pieces, many a seemingly standardized 60-65 cm X 15 cm. The function of the large semi-circular lead "ingot" (26 cm X 35 cm), first seen in 2004, remains a mystery.

Site plan of Hermes shipwreck completed in 2008.
The character of the Hermes site, only about 400 meters to the west of the Pearl, differs considerably from her consort's remains in both the distribution of the artifacts and in their state of deterioration. Whereas the features and artifacts of the Pearl lie in close proximity (site length roughly corresponding to the estimated length of the ship with anchors near the bow and ballast and gudgeon towards midships and stern), the Hermes site is a seemingly formless scatter area. The 327-ton Pearl grounded into a sandy coral groove, pressing its wooden keel into the sediment, while the smaller 258-ton Hermes hit the hard sea bed and spilled its ballast into several adjacent shallow crevices. The Hermes's trypots, anchors, lead ingot, and blubber hook, etc. are scattered at a considerable distance from one another, over an extremely rough coral substrate. Here, the force of the ocean and the nature of the sea floor seem to account most for the wider distribution of artifacts. Perhaps the Hermes, the first vessel to hit the reef, broke apart quickly and scattered with greater force than the Pearl. The picture of the site gives the impression of a ship loose on the reef, being pushed about as portions of the hull are opened and heavy ballast and cannon dropped in discrete spots. Ship's carpenter James Robinson commented in a letter to his mother, "When the vessel struck she was thrown on her beam end and being endangered by the masts falling (if which had happened must inevitably have smashed the boats and then all manner of assistance was gone) - but God ordained it otherwise." The Hermes was not cradled by the reef, but disintegrated as she pounded across the sharp substrate. The Pearl, sailing close by and striking the reef only a few minutes later, was more fortunate. She seems to have lodged firmly in place in a deeper groove with her stern seaward, and then she broke up more gradually over time.
A blubber hook at the Hermes shipwreck site. Credit: NOAA/Casserley.
The combined crew, totaling 57 souls, were castaway with what meager provisions they could salvage on a nearby island for months. One of the carpenters on board the Hermes, James Robinson, supervised the building of a small 30-ton schooner named Deliverance on the beach. Though most of the crew elected to board the passing ship Earl of Morby, Robinson and 11 others were able to recoup some of the financial losses from the wreck by taking possession of the nearly finished Deliverance, sailing her back to Honolulu, and eventually selling her there for $2,000. From there Robinson went on to found the highly successful James Robinson and Company shipyard in 1827 and became an influential member of the island community.
A team of NOAA maritime archaeologists began to survey the site in 2005. At that time, rough conditions prevented a thorough documentation of the site. Photographs and preliminary site documentation took place on the fore reef, and a more thorough inventory of artifacts occurred in the calmer waters of the lagoon where smaller, light artifacts were scattered. In 2008, a team of NOAA maritime archaeologists returned to the site and completed a thorough documentation of the site, finishing a site plan and collecting photographs and high definition video footage of the site.
 Tane Casserley documents an early 19th century anchor at the Hermes shipwreck site. Credit: NOAA/Casserley.
Cannon resting on the reef at the Hermes shipwreck site. Credit: NOAA/Casserley.
Co Trustees |
World Heritage |
Big Ocean |
Contact Us Link Disclaimer User Survey Privacy Policy |
PMNM Webmaster Web site owner: National Ocean Service Office of National Marine Sanctuaries National Oceanic and Atmospheric Administration Main Office: NOAA/Daniel K. Inouye Regional Center NOS/ONMS/PMNM, 1845 Wasp Blvd, Building 176 Honolulu, HI 96818 | Phone: 808-725-5800 | Fax: 808-455-3093 |